How to Fix a Concrete Driveway Crack
This is a brief article on how to fix Concrete Driveway Crack.
 If the ground under your concrete has a lot of movement then your concrete tends to crack. Sometimes this is impossible to fix this although it is quite hard to tell whether it is the ground moving or just bad concrete. Some other reasons why your concrete might have cracked is no steel layer in your concrete when it was installed, heavy construction with earth moving and ground compacting, if there has been some heavy construction in your area and they have been using industrial vibrating equipment to the point where you can feel the vibration this is most likely the cause for your cracking.
There are a few ways to go about fixing your problem, I will explain the most efficient and easiest way i know. To fill the cracks I use a two-part epoxy resin; epoxy has a really good adhesive rating and is extremely strong though we will get to this part later.
Step 1. Firstly you will have to examine the cracks. If they are quite wide and deep you have a serious problem, basically don’t waste your time they will probably re-crack a few weeks later. In this case contact a local contractor to seek advice on the matter. If the cracks are only surface cracks then you are good to go, keeping in mind there is never a guarantee the wont crack again.
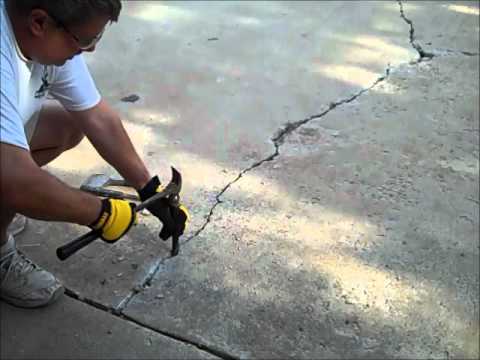
Step 2. You must cut the cracks open enough to be able the get the epoxy in, and usually about %75 of the way down into the slab. Average driveway and footpath slabs are about 100mm – 120mm though some footpaths might be less and some driveways may be more. To do this you should use an angle grinder with a diamond blade on it 4″ grinders are usually a bit small better with a 7″ or 9″. Be sure to wear all PPE as these tools are very dangerous.
Step 3. Once you have cut the cracks open you must clean them out thoroughly. Use a pressure washer to blast them clean and it is a good idea to pour chlorine in the crack before pressure cleaning to kill any mould spores. After you have cleaned them properly leave them to dry completely (no moisture can be present when applying epoxy or it will not bond with the concrete properly).
Step 4. Mix the epoxy with sand to stop shrinkage then use a trowel or paint scraper to push it into the cracks, leave it raised above the level of the concrete or it will shrink down and you will have to apply a second coat. Most epoxy will take at least 8 hours to dry unless you use a fast cure.
Step 5. Use a 9″ grinder with a diamond cup wheel on it (a vacuum attachment is advised) and grind the epoxy flat level with the concrete and you are done.
This will not look very appealing to the eye once it is finished, so a concrete resurfacing coating is advised. For more information on this please visit my website link located below.
elavil for migraines dosage
elavil for migraines dosage
efectos colaterales del mestinon
efectos colaterales del mestinon
buy generic pyridostigmine no prescription
buy generic pyridostigmine no prescription
imitrex sunburn
imitrex sunburn
diclofenac sodium topical gel 1 percent
diclofenac sodium topical gel 1 percent
can you take colpermin mebeverine together
can you take colpermin mebeverine together
amitriptyline 25mg for pain
amitriptyline 25mg for pain
can i take ibuprofen and indomethacin
can i take ibuprofen and indomethacin
cilostazol tocris
cilostazol tocris
intrathecal baclofen for als
intrathecal baclofen for als
contra indicações do piroxicam
contra indicações do piroxicam
drug class of mobic
drug class of mobic
sumatriptan bei kopfschmerzen
sumatriptan bei kopfschmerzen
imdur drug monograph
imdur drug monograph
azathioprine fibrose pulmonaire
azathioprine fibrose pulmonaire
imuran chicken pox
imuran chicken pox
rizatriptan generic maxalt
rizatriptan generic maxalt
lioresal baclofene achat
lioresal baclofene achat
maxalt wafers how to take
maxalt wafers how to take
can meloxicam be taken twice a day
can meloxicam be taken twice a day
artane boys home dublin
artane boys home dublin
what is zanaflex medicine
what is zanaflex medicine
cyproheptadine normal dose
cyproheptadine normal dose
tizanidine indications
tizanidine indications
how can i get ketorolac pills
how can i get ketorolac pills
get cheap toradol no prescription
get cheap toradol no prescription
can periactin or cyproheptadine help you gain weight
can periactin or cyproheptadine help you gain weight
anatoliy-alekseyevich-derkach.ru
anatoliy-alekseyevich-derkach.ru
dilts.g-u.su
dilts.g-u.su
xblx.ru
xblx.ru
r2f.ru
r2f.ru
psy
psy
439W6fo
439W6fo
Forum
Forum
t.me/s/psy_chat_online
t.me/s/psy_chat_online
Sochi-psiholog-Russia
Sochi-psiholog-Russia
site
site
instagram.com/korotkovlakanfreud
instagram.com/korotkovlakanfreud
5yucMCMAAAAJ
5yucMCMAAAAJ
atvip.ru
atvip.ru
0410.ru
0410.ru
myprin92.ru
myprin92.ru
Ïñèõîëîã, ïñèõîòåðàïåâò, ïñèõèàòð, ïñèõîàíàëèòèê
Ïñèõîëîã, ïñèõîòåðàïåâò, ïñèõèàòð, ïñèõîàíàëèòèê
ekzistenczialnyj
ekzistenczialnyj
here
here
psikhologvyalte.ru
psikhologvyalte.ru
psycholog-korotkov.ru
psycholog-korotkov.ru
professorkorotkov.ru
professorkorotkov.ru
groups
groups
tiktok
tiktok
axbb.ru
axbb.ru
human design
human design
dizain cheloveka
dizain cheloveka
androxal canadian healthcare pharmacy
buying androxal where to purchase
cheapest buy enclomiphene australia price
cheap enclomiphene purchase online safely
buy rifaximin canada no prescription
buying rifaximin purchase online from india
get xifaxan buy from canada
can i get xifaxan at at wal-mart store without a prescrition
how to buy staxyn buy in london
No perscription staxyn
buying avodart cheap mastercard
purchase avodart cheap from usa
dutasteride online no prescription
cod delivery dutasteride
prices for flexeril cyclobenzaprine at walmart
flexeril cyclobenzaprine from canada without a prescription
no prescription gabapentin
buying gabapentin generic equivalent buy
acheter kamagra en ligne france
kamagra interactions médicamenteuses
cheapest buy fildena uk generic
buy fildena cheap with prescription
itraconazole cheap
get itraconazole where to purchase
kamagra kanadská lékárna
kanadská online lékárna kamagra 25mg levně
youtube-videos
youtube-videos
HumanDesign2028.ru
HumanDesign2028.ru
hdmy.ru
hdmy.ru
dizain-cheloveka-manifestor.ru
dizain-cheloveka-manifestor.ru
Lider
Lider
The Creator Causal Design
The Creator Causal Design
wikinlp.ru
wikinlp.ru
wikinlp
wikinlp
reglan for nausea
reglan for nausea
psy.w-495.ru
psy.w-495.ru
zithromax z pak
zithromax z pak
doxycycline liquid
doxycycline liquid
doxycycline hyclate 100 mg tab
doxycycline hyclate 100 mg tab
propecia
propecia
levitra medication
levitra medication
metoprolol brand
metoprolol brand
tetracycline antibiotics for h pylori
tetracycline antibiotics for h pylori
prescribed antibiotics online
prescribed antibiotics online
furosemide 40 mg for dogs
furosemide 40 mg for dogs
zudena 100mg
zudena 100mg
nexium generic over the counter
nexium generic over the counter
tadalafil other names
tadalafil other names
cenforce 100 from india
cenforce 100 from india
vidalista for sale
vidalista for sale
doxycycline for dogs 100mg uses
doxycycline for dogs 100mg uses
metronidazole for rosacea cost
metronidazole for rosacea cost
sildenafil 20 mg tablet reviews
sildenafil 20 mg tablet reviews
keeps minoxidil foam
keeps minoxidil foam
bupropion lowering dose
bupropion lowering dose
acyclovir cream how to apply
acyclovir cream how to apply
terbinafine dosage complete guide
terbinafine dosage complete guide
terbinafine mechanism full overview
terbinafine mechanism full overview
terbinafine nail fungus treatment
terbinafine nail fungus treatment
minoxidil 2% vs 5% comparison
minoxidil 2% vs 5% comparison
minoxidil duration structured guide
minoxidil duration structured guide